
Studio apartments demand strategic thinking. You’re working with a single open room, no separate bedroom, no dining room, no escape routes for clutter. But that constraint is also an advantage: every design choice counts. Whether you’re furnishing from scratch or refreshing what you’ve got, the key to decorating a studio apartment is intentional placement, smart color choices, and multipurpose pieces that work harder than traditional furniture. This guide walks you through proven strategies for small apartment decor that feels spacious, organized, and genuinely reflective of your style, without hiring an interior designer or blowing your budget.
Table of Contents
ToggleKey Takeaways
- Define distinct functional zones in your studio apartment using furniture arrangement, area rugs, and visual markers to make one room feel like multiple purposeful spaces.
- Choose a light, neutral wall color as your base and layer in 3–4 total colors through textiles and accessories to create a cohesive, spacious feel without overwhelming the eye.
- Invest in multipurpose furniture and vertical storage solutions—like storage ottomans, lofted beds, and floating shelves—to maximize limited floor space and reduce visual clutter.
- Layer your lighting with ambient, task, and accent sources, and use mirrors and reflective surfaces to multiply natural light and make walls feel deeper.
- Measure traffic patterns and your actual lifestyle before arranging furniture; sketching your layout or using a free tool like Floorplanner prevents costly rearrangement mistakes.
- Add textural depth through textiles, wall art, plants, and tactile elements that make studio apartment decor feel intentional and designed rather than cramped or default.
Define Your Space with Zones and Strategic Furniture Placement
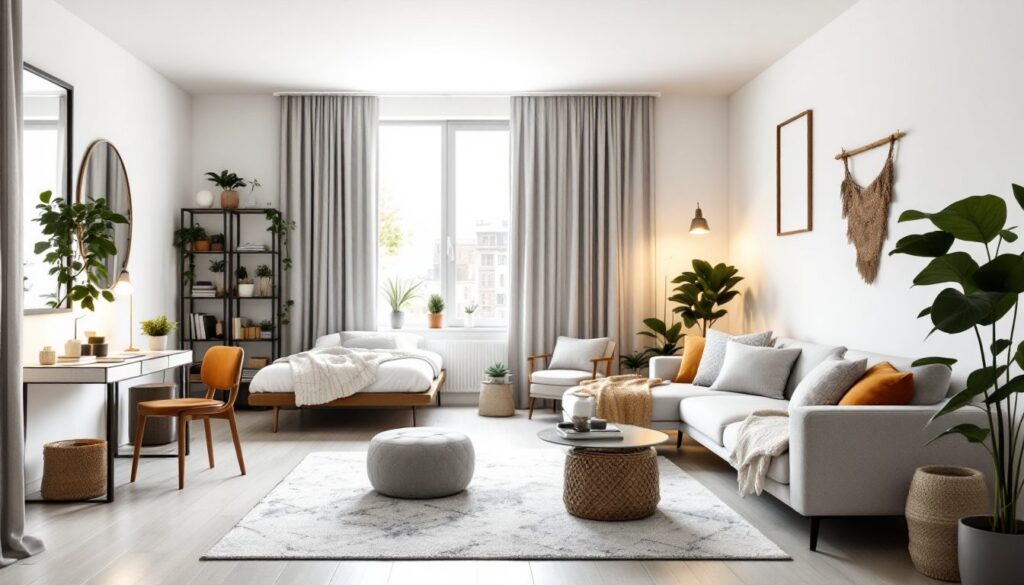
A studio apartment is one room pretending to be several. Your job is to make that illusion believable. Start by defining functional zones: sleeping, living, working, eating. You won’t build walls, but you can use furniture arrangement, area rugs, and visual markers to signal where each zone begins and ends.
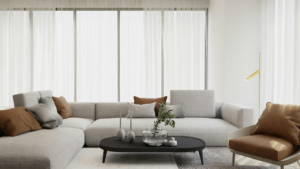
Position your bed against the wall that’s farthest from the entrance, this draws the eye away from your sleeping area when someone walks in. Use a low console table or floating shelves behind the sofa to create an informal room divider. An area rug under your living room furniture anchors that space and signals “living zone” to your brain and anyone visiting.
Keep furniture legs exposed whenever possible. Low-profile pieces with visible feet create visual lightness compared to skirted or bulky furniture. A streamlined bed frame, a sofa with exposed legs, and lightweight dining chairs all contribute to a sense of openness. Place larger pieces (sofa, bed) parallel to walls rather than floating them in the middle of the room, this keeps traffic flow clear and makes the space feel less cramped.
Consider traffic patterns from the entrance to the kitchen and bathroom. Arrange seating so it doesn’t block these natural pathways. A diagonal furniture layout sometimes works better than a square-to-the-walls approach, especially in oddly shaped studios. Test the arrangement before committing: move pieces around for a few days to see what feels natural.
Choose the Right Color Palette and Lighting
Color and light are your secret weapons for making a studio feel larger and more intentional.
Using Light Colors and Unified Hues to Open Up Your Space
Stick to a base of light, neutral wall colors, soft whites, warm grays, or pale beiges. These reflect light and create a neutral backdrop that makes the entire space feel bigger. This doesn’t mean your studio has to look sterile. The neutrality is a canvas, not the final statement.
Choose an accent color or two and repeat it throughout the space in textiles, art, and accessories. If you love navy, use it in throw pillows, a wall hanging, and maybe a painted accent wall in one corner. Repetition creates cohesion, and cohesion makes small spaces feel intentional rather than chaotic. Limit your palette to three to four colors total (including your neutrals) so the eye doesn’t bounce around overwhelmed.
Lighting makes or breaks a studio. A single overhead fixture won’t cut it. Layer your lighting with ambient light (ceiling fixture), task lighting (desk lamp, bedside lamp), and accent lighting (string lights, clip lamps on floating shelves). Position a floor lamp in the living area and a table lamp near your bed. These separate light sources create warmth and let you adjust brightness for different activities and moods.
If you have windows, maximize natural light. Use sheer curtains instead of blackout shades during the day, and add reflective surfaces, mirrors, glass table tops, polished metals, to bounce daylight around the room. Mirrors opposite a window multiply natural light’s impact and make walls feel deeper. A mirror behind your sofa or beside a window is both functional and visually expansive.
Maximize Space with Smart Furniture and Storage Solutions
In a studio, every piece of furniture must justify its existence. Bloated sectionals and oversized dressers will strangle your space. Instead, embrace multipurpose and vertical storage.
Multipurpose and Vertical Storage Options
Look for furniture that does double duty. A storage ottoman serves as seating and hides blankets or magazines. A console table behind your sofa becomes a desk, dining surface, or display shelf. A bed with built-in drawers underneath uses that dead space for seasonal clothing or bedding. Some studios benefit from a lofted bed, if ceilings allow (typically 9 feet minimum), to free up floor space for living areas below.
Small apartment interior design focuses on vertical thinking. Install floating shelves above your desk, bed, or sofa to display books, plants, and decorative objects without eating floor space. Tall, narrow bookcases tuck into corners and draw the eye upward, making ceilings feel higher. Use the wall space above furniture, pegboards, wall-mounted organizers, and hanging planters all add storage and style without floor footprint.
Choose furniture with open bases (shelves instead of solid cabinets where possible) so you can see the floor underneath. This visual continuity makes even a small footprint feel less heavy. A glass or metal side table reads as “barely there” compared to a solid wood one.
Resist the urge to buy furniture that fits your idealized future. If you know you’ll never use a formal dining table, don’t buy one just because studios traditionally have them. Be honest about what you actually do in your space, and shop accordingly. This one shift, buying for reality instead of expectation, eliminates more clutter than any organizing system.
Create Visual Interest and Separation Without Walls
A monochromatic, empty studio feels depressing. A cluttered one feels chaotic. The sweet spot is layered visual interest that still respects your zone boundaries.
Use textiles to add depth and define areas. A patterned rug under the living room seating is different from the one (or none) under the bed or desk. Layer throw pillows in complementary colors and textures on your sofa. Hang curtains from ceiling to floor, even if you have a window on a small wall, this draws the eye upward and makes the space feel taller.
Art and wall décor anchor each zone. A large piece of wall art above the sofa, a floating shelf with a few curated objects above your desk, and a small gallery wall or mirror statement behind your bed all tell the story that these are separate, intentional spaces. Apartment living room decor benefits from this visual storytelling, each corner feels purposeful.
Green plants serve double duty: they soften hard edges, add color and life, and are relatively cheap. A tall plant in one corner, a small succulent on your shelf, and a hanging pothos above your window cost far less than furniture but dramatically change the feel. Plants also improve air quality, which matters in a sealed studio with no separate ventilation.
Textured elements, a woven wall hanging, a chunky knit throw, a wood accent shelf, add richness without bulk. These tactile details make a small space feel designed rather than default.
Master the Layout for Your Studio Apartment
The best layout depends on your room’s footprint and what matters most to you. There’s no universal “correct” answer, but there are proven approaches.
The L-Shaped Layout: Position your bed on one wall and your sofa on the perpendicular wall. This creates a natural corner for each activity and maximizes wall space for storage and décor. The kitchen remains separate (usually part of the studio’s “entry” end), and your living/sleeping zones are distinct.
The Linear Layout: Arrange the bed, living area, and work space in a line from the entrance. This works well in long, narrow studios where rooms feel like hallways. Floating rugs or subtle color changes mark transitions between zones.
The Corner Advantage: If you have two walls with windows or good natural light, position your desk or reading nook there. Natural light transforms a work-from-home setup and makes a small space feel less dreary. Pair the area with proper task lighting for evening work.
Before buying anything new, live in your space for a week or two. Note where you naturally sit, where light is best, and where traffic flows. Then arrange your existing furniture to match those patterns. Most layout mistakes come from choosing arrangement style before understanding how you actually use the space.
Small apartment decorating ideas flourish when layout serves function. Test configurations by sketching on paper or using a free tool like Floorplanner to visualize before moving anything heavy. This ten-minute planning step saves hours of furniture wrestling later.